

Create an XMTP client
Create an XMTP client that can use the signing capabilities provided by the signer. This signer links the client to the appropriate EOA or SCW.
Understand creating and building a client
This video provides a walkthrough of creating and building a client.
How it works
When you call Client.create(), the following steps happen under the hood:
- Extracts the
signerand retrieves the wallet address from it. - Checks the XMTP identity ledger to find an inbox ID associated with the signer address. The inbox ID serves as the user's identity on the XMTP network.
- If it doesn't find an existing inbox ID, it requests a wallet signature to register the identity and create an inbox ID.
- If it finds an existing inbox ID, it uses the existing inbox ID.
- Checks if a local SQLite database exists. This database contains the identity's installation state and message data.
- If it doesn't find an existing local database, it creates one. On non-web platforms, it encrypts the database with the provided
dbEncryptionKey. - If it finds an existing local database:
- For the Node, React Native, Android, and iOS SDKs: It checks if the provided
dbEncryptionKeymatches. If it matches, it uses the existing database. If not, it creates a new database encrypted with the provided key. - For the Browser SDK: A
dbEncryptionKeyis not used for encryption due to technical limitations in web environments. Be aware that the database is not encrypted.
- For the Node, React Native, Android, and iOS SDKs: It checks if the provided
- If it doesn't find an existing local database, it creates one. On non-web platforms, it encrypts the database with the provided
- Returns the XMTP client, ready to send and receive messages.
Keep the database encryption key safe
The dbEncryptionKey client option is used by the Node, React Native, Android, and Swift SDKs only.
The encryption key is critical to the stability and continuity of an XMTP client. It encrypts the local SQLite database created when you call Client.create(), and must be provided every time you create or build a client.
As long as the local database and encryption key remain intact, you can use Client.build() to rehydrate the same client without re-signing.
This encryption key is not stored or persisted by the XMTP SDK, so it's your responsibility as the app developer to store it securely and consistently.
If the encryption key is lost, rotated, or passed incorrectly during a subsequent Client.create() or Client.build() call (on non-web platforms), the app will be unable to access the local database. Likewise, if you initially provided the dbPath option, you must always provide it with every subsequent call or the client may be unable to access the database. The client will assume that the database can't be decrypted or doesn't exist, and will fall back to creating a new installation.
Creating a new installation requires a new identity registration and signature—and most importantly, results in loss of access to all previously stored messages unless the user has done a history sync.
To ensure seamless app experiences persist the dbEncryptionKey securely, and make sure it's available and correctly passed on each app launch
The dbEncryptionKey client option is not used by the Browser SDK for due to technical limitations in web environments. In this case, be aware that the database is not encrypted.
To learn more about database operations, see the XMTP MLS protocol spec.
Database encryption key loss during iOS device transfers
When you transfer data to a new iOS device, the local database file may be moved without the encryption key, causing decryption errors. This commonly occurs when users choose Apple's direct transfer option during new device setup, as Apple aggressively moves files to the new device. To prevent this issue, exclude the database directory from backups and device transfers.
For example, if you set a custom dbPath to a known directory, you can mark it as excluded from backups in iOS:
func addSkipBackupAttribute(var folder: URL) throws {
try folder.setResourceValue(true, forKey: .isExcludedFromBackupKey)
}To learn more about this function, see isExcludedFromBackupKey in Apple's documentation.
View an encrypted database
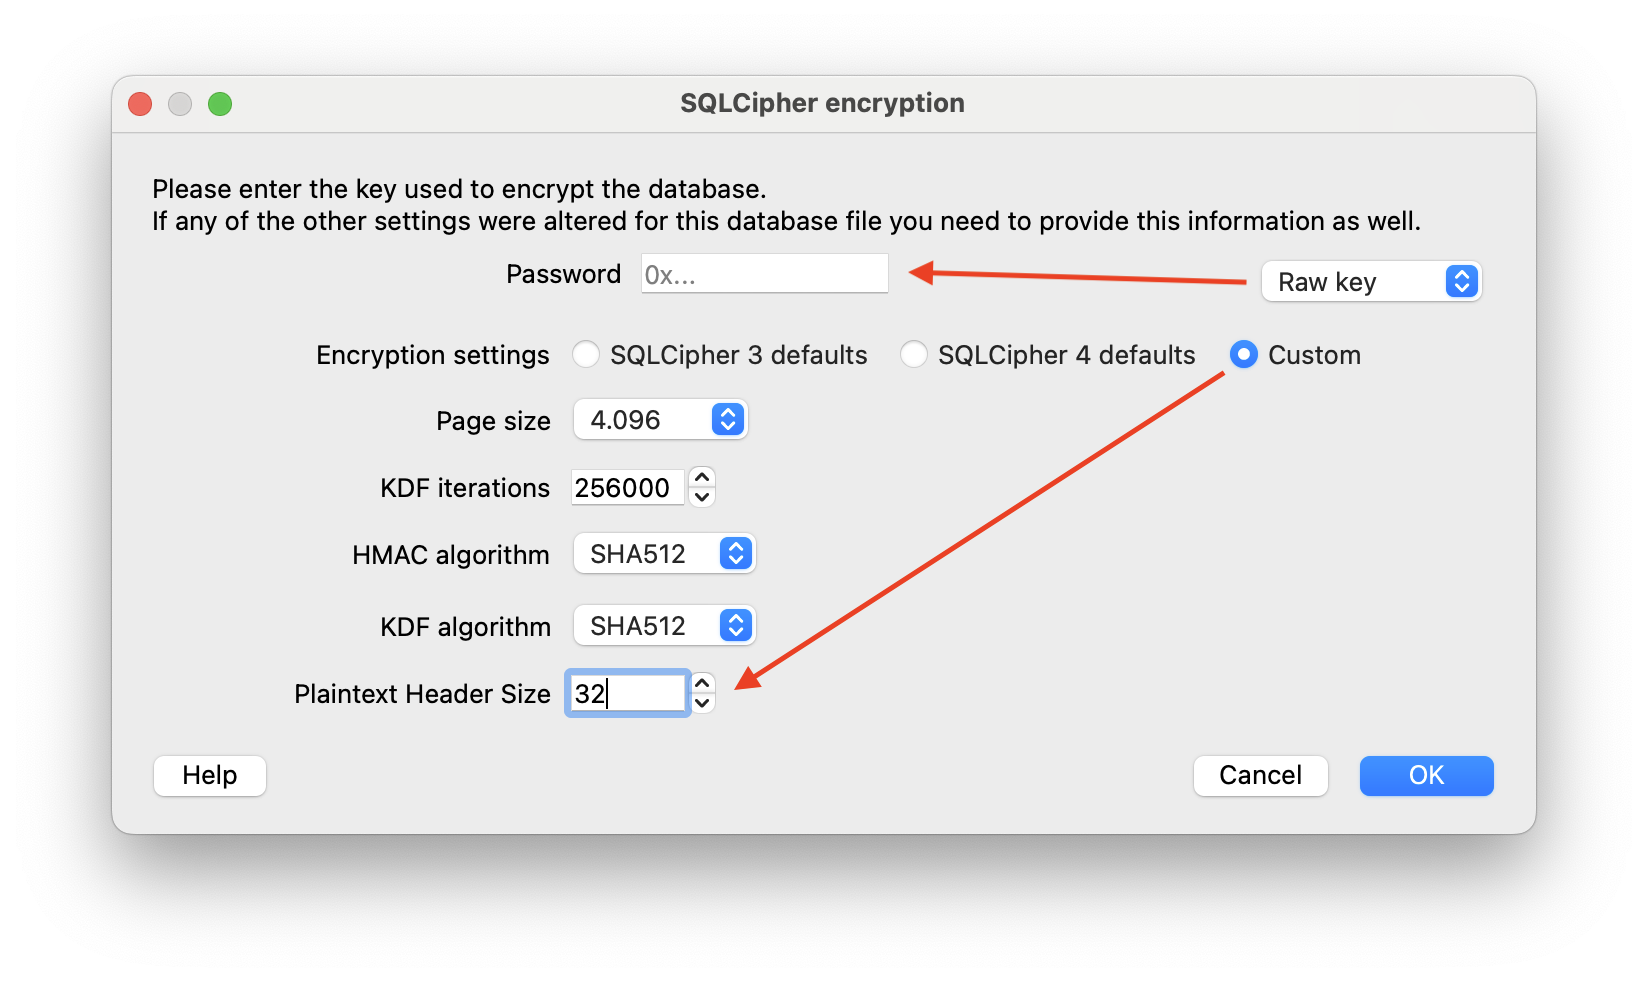
For debugging, it can be useful to decrypt a locally stored database. When a dbEncryptionKey is used, the XMTP client creates a SQLCipher database which applies transparent 256-bit AES encryption. A .sqlitecipher_salt file is also generated alongside the database.
To open this database, you need to construct the password by prefixing 0x (to indicate hexadecimal numbers), then appending the encryption key (64 hex characters, 32 bytes) and the salt (32 hex characters, 16 bytes). For example, if your encryption key is A and your salt is B, the resulting password would be 0xAB.
The database also uses a plaintext header size of 32 bytes.
If you want to inspect the database visually, you can use DB Browser for SQLite, an open source tool that supports SQLite and SQLCipher. In its Custom encryption settings, set the Plaintext Header Size to 32, and use the full Password as a Raw key:
Create a client
To call Client.create(), you must pass in a required signer and can also pass in any of the optional parameters covered in Configure an XMTP client.
import { Client, type Signer } from '@xmtp/browser-sdk';
// create a signer
const signer: Signer = {
/* ... */
};
const client = await Client.create(
signer,
// client options
{
// Note: dbEncryptionKey is not used for encryption in browser environments
}
);Configure an XMTP client
You can configure an XMTP client with these options passed to Client.create:
import type { ContentCodec } from '@xmtp/content-type-primitives';
type ClientOptions = {
/**
* Specify which XMTP environment to connect to. (default: `dev`)
*/
env?: 'local' | 'dev' | 'production';
/**
* Add a client app version identifier that's included with API requests.
* Production apps are strongly encouraged to set this value.
*
* You can use the following format: `appVersion: 'APP_NAME/APP_VERSION'`.
*
* For example: `appVersion: 'alix/2.x'`
*
* If you have an app and an agent, it's best to distinguish them from each other by
* adding `-app` and `-agent` to the names. For example:
*
* - App: `appVersion: 'alix-app/3.x'`
* - Agent: `appVersion: 'alix-agent/2.x'`
*
* Setting this value provides telemetry that shows which apps are using the
* XMTP client SDK. This information can help XMTP core developers provide you with app
* support, especially around communicating important SDK updates, deprecations,
* and required upgrades.
*/
appVersion?: string;
/**
* apiUrl can be used to override the `env` flag and connect to a
* specific endpoint
*/
apiUrl?: string;
/**
* historySyncUrl can be used to override the `env` flag and connect to a
* specific endpoint for syncing history
*/
historySyncUrl?: string | null;
/**
* Allow configuring codecs for additional content types
*/
codecs?: ContentCodec[];
/**
* Path to the local DB
*
* There are 4 value types that can be used to specify the database path:
*
* - `undefined` (or excluded from the client options)
* The database will be created in the current working directory and is based on
* the XMTP environment and client inbox ID.
* Example: `xmtp-dev-<inbox-id>.db3`
*
* - `null`
* No database will be created and all data will be lost once the client disconnects.
*
* - `string`
* The given path will be used to create the database.
* Example: `./my-db.db3`
*
* - `function`
* A callback function that receives the inbox ID and returns a string path.
* Example: `(inboxId) => string`
*/
dbPath?: string | null | ((inboxId: string) => string);
/**
* Encryption key for the local DB (32 bytes)
*
* Accepts either:
* - Uint8Array (32 bytes)
* - Hex string with 0x prefix (64 hex characters representing 32 bytes)
*/
dbEncryptionKey?: Uint8Array | `0x${string}`;
/**
* Enable structured JSON logging
*/
structuredLogging?: boolean;
/**
* Enable performance metrics
*/
performanceLogging?: boolean;
/**
* Logging level
*/
loggingLevel?: 'off' | 'error' | 'warn' | 'info' | 'debug' | 'trace';
/**
* Disable automatic registration when creating a client
*/
disableAutoRegister?: boolean;
/**
* Disable device sync
*/
disableDeviceSync?: boolean;
};Set the appVersion client option
Be sure to set the appVersion client option for your production app.
You can use the following format: appVersion: 'APP_NAME/APP_VERSION'.
For example: appVersion: 'alix/2.x'
If you have an app and an agent, it's best to distinguish them from each other by adding -app and -agent to the names. For example:
- App:
appVersion: 'alix-app/3.x' - Agent:
appVersion: 'alix-agent/2.x'
The appVersion value is included with API requests to provide telemetry that shows which apps are using the XMTP client SDK. This information can help XMTP core developers provide you with app support, especially around communicating important SDK updates, deprecations, and required upgrades.
To learn how to retrieve the client appVersion and libxmtpVersion values for debugging purposes, see Get client version information.
XMTP network environments
XMTP provides dev and production network environments. These networks are completely separate and not interchangeable.
For example, an XMTP identity on the dev network is completely distinct from the XMTP identity on the production network, as are the messages associated with these identities. In addition, XMTP identities and messages created on the dev network can't be accessed from or moved to the production network, and vice versa.
The production network is configured to store messages indefinitely. XMTP may occasionally delete messages and identities from the dev network, and will provide advance notice in the XMTP Technical Forums.
You can use a local network environment to have a client communicate with an XMTP node you are running locally. During development, using local is a great option for speed and reliability. Use the xmtp-local-node repo to easily run a local XMTP node.
Build an existing client
Build, or resume, an existing client (created using Client.create()) that's logged in and has an existing local database.
For React Native, Android, and iOS SDKs, when building a client with an existing inboxId, the client automatically operates in offline mode since no network request is needed to check the identity ledger. In offline mode, the client:
- Skips all network requests (preference syncing between installations, validating inbox, etc.)
- Works entirely from the local database
- Can be synchronized later with
syncAllConversations()or by recreating the client without the offline flag.
import { Client, IdentifierKind, type Identifier } from '@xmtp/browser-sdk';
const identifier: Identifier = {
identifier: '0x1234567890abcdef1234567890abcdef12345678',
identifierKind: IdentifierKind.Ethereum,
};
const client = await Client.build(identifier, options);Log out a client
When you log a user out of your app, you can give them the option to delete their local database.
/**
* The Browser SDK client does not currently support deleting the local database.
*/
// this method only terminates the client's associated web worker
client.close();